Part I. What is ArcPy?
Unfortunately ArcPy [expand title=”is not”]

An arc of pie.[/expand]
Rather it is a scripting environment for ArcGIS tasks, that uses Python. As with everything ESRI there are multiple ways to interact with ArcPy:
- Through the Python Console window in ArcMap
- Through the system’s python environment.
Because there are more chances things can go wrong, and we live dangerously, we are going to use the more risky (but more flexible!!!) option #2.
Before going into ArcPy though, you might be asking ArcWhy? Or maybe ArcPy Why? Or Maybe ArcWhyPy?
The answer lies in that ArcPy is used to automate processing for ArcMap. In other words, doing geoprocessing.
To recap from our previous workshops, examples of geoprocessing includes the following:
- spatial statistics
- generating origin-destination
- creating buffers
- and even mundane field calculations
Each one of those tasks has a help section on ESRI that tells you exactly how to use it in the ArcPy environment. The key difference between using ArcPy in ArcMap (#1) or ArcPy in the Python environment (#2) is that in the first case your scripts cannot be saved natively. The main drawback to using the Python environment (case #2) is that you have less flexibility with the ArcMap program. Naturally one can go back and forth, but that is a lesson for another day.
Let’s reassure you that every process in ArcMap has a Python script. First check out the “help section” following tool that we just ran “Cost Path”
Scroll down until you see the Code Sample section:
Wallah! There is the code sample!

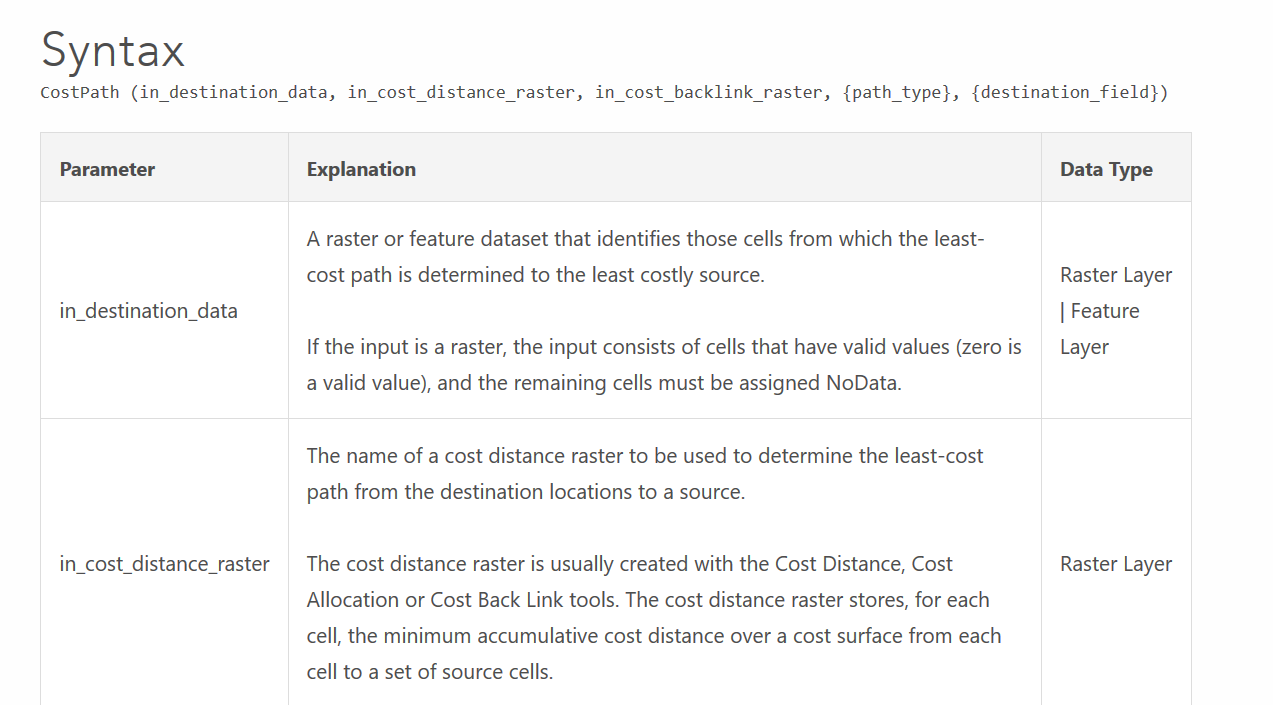
If you scroll back up to the parameter section, that is where you will find the syntax, which essentially is the settings for the tool. It looks like this:
 Let’s break it down a little bit:
- The name of the tool being used
- Is the input destination data
- Is the input cost raster
- Is the input cost raster backlink
- Optional path type because is because it is enclosed in brackets.
- Optional destination field
All these fields should be familiar because we just ran them earlier!
Part II. Example Script
For this example, we want to create individual features from our usa_state_captials layer.
First, let’s take a look at the documentation:
http://desktop.arcgis.com/en/arcmap/10.5/tools/analysis-toolbox/split-by-attributes.htm
Ok, let’s start scripting! Locate “Python IDLE”in your start menu:

The Python console will open up:

And then go to “new file”:

Now we can start scripting. We will need to import the arcpy module, using import arcpy this allows us to use ArcPy. We will also be using the env class from arcpy so we bring it in using from arcpy import env .
# Import required modules
import arcpy
from arcpy import env
Now we will define some variables:
# Set environment variables
env.workspace = r".\\sa_workshop2018.gdb"
inputData = "us_state_capitals"
What are variables you might ask? Well, they are basically statements. For this example, we are going to set a env.workspace , which is our geodatabase, and set the name of the inputData to the features we want to grab.
Now, let’s define some more variables for the program:
# Set the program variables
in_feature_class = env.workspace+'\\'+inputData
target_workspace = env.workspace+'\\'
fields = ['NAME']
in_feature_class is the data we will be using, and the target_workspace is the location where we will be creating the new features, and fields tells us what to separate the data based on.
Now we can run the tool:
arcpy.SplitByAttributes_analysis(in_feature_class, target_workspace, fields)
The order of the fields is very important because it has to match with the documentation.
Our final code should look like this:
# Import required modules
import arcpy
from arcpy import env

# Set environment variables
env.workspace = r".\\sa_workshop2018_al.gdb"
inputData = "us_state_capitals"

# Set the program variables
in_feature_class = env.workspace+'\\'+inputData
target_workspace = env.workspace+'\\'
fields = ['NAME']

arcpy.SplitByAttributes_analysis(in_feature_class, target_workspace, fields)
Enjoy your ArcPy

Extra Script:
Here’s another script that adds a new field.
#import the necessary python modules

import arcpy
from arcpy import env

env.workspace = r"./sa_workshop2018.gdb"

# Use UpdateCursor to access state name and the population count
inputData = "us_state_capitals"
fieldName = "cityOD"
fieldAlias = "cityOrginsDestinations"
fieldPrecision = 2
fieldLength = 1
fieldType = "TEXT"

# Set the population threshold to 100,000
popThreshold = 100000

# try to add a new field
try:
	arcpy.AddField_management(inputData, fieldName, fieldType, fieldPrecision, "", "",fieldAlias, "NULLABLE")
except:
	print('skipping, because field already exists')

# try to alter the new field based on a popThreshold
try:
	with arcpy.da.UpdateCursor(env.workspace+'/'+inputData,['POP2007',fieldName,'NAME']) as cursor:
		for row in cursor:
			if (row[0] >= popThreshold):
				row[1] = "Origin"
			else:
				row[1] = "Destination"
			cursor.updateRow(row)
			print(row[2])
		del cursor
except:
	print("An error occured")